Hi guys,
I hope it's okay that I post this great project which we recently collaborated on with a Max2Play user to publish in our blog.
If not, just let me know and I'll delete it right away. I just thought it might be pertinent to this sub forum
For a more detailed version of the article, check our blog.
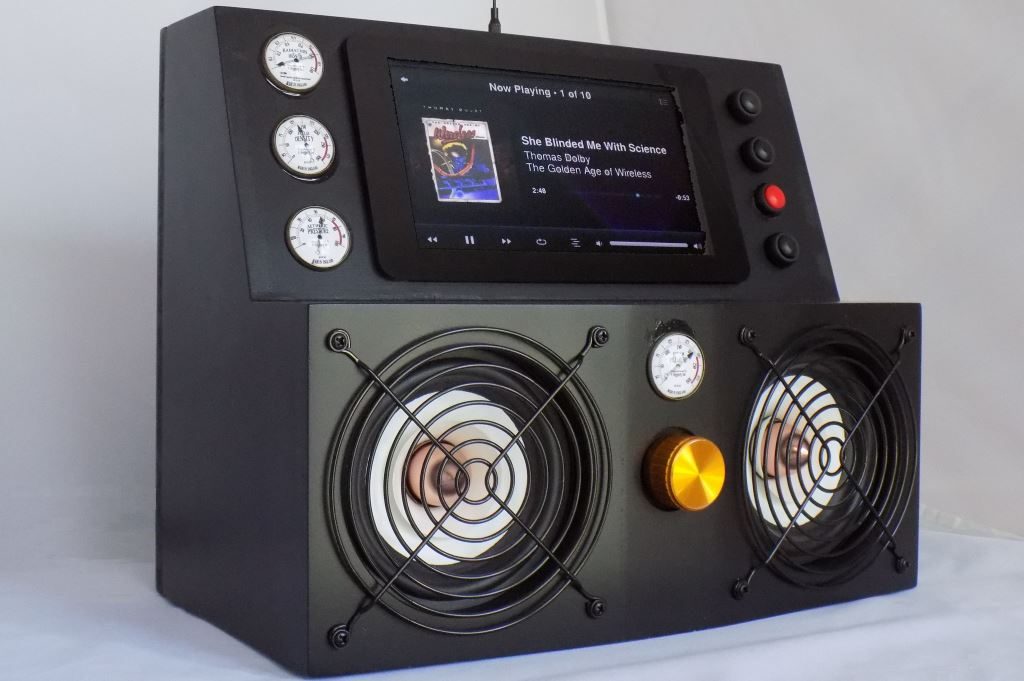
Hi guys, this article is a big one! It is Joe Jaworski’s Jetsons Music Box, a fantastic piece of DIY production utilizing the some of the best features of Max2Play and the high-end sound of the HiFiBerry DAC+ sound card.
I contacted Joe a few weeks ago after seeing his project in a contest when I thought this has to have been made with Max2Play. He was fully on board and wrote this great, detailed report on how he got the idea for the box and how he was able to fully realize it thanks to the powerful components and a little bit of our software.
I hope you enjoy reading the article as much as I did collaborating with Joe on it!
Heiner from Max2Play
My motivation for building this project comes from the fact that the Logitech Corporation discontinued its Squeezebox and UE Radio lines several years ago. I have been a big fan of this open-source streaming protocol since the original SlimDevices products of 2001. I have many Squeezebox players throughout my home. I have looked at more modern alternatives but have not found any that meet my needs.
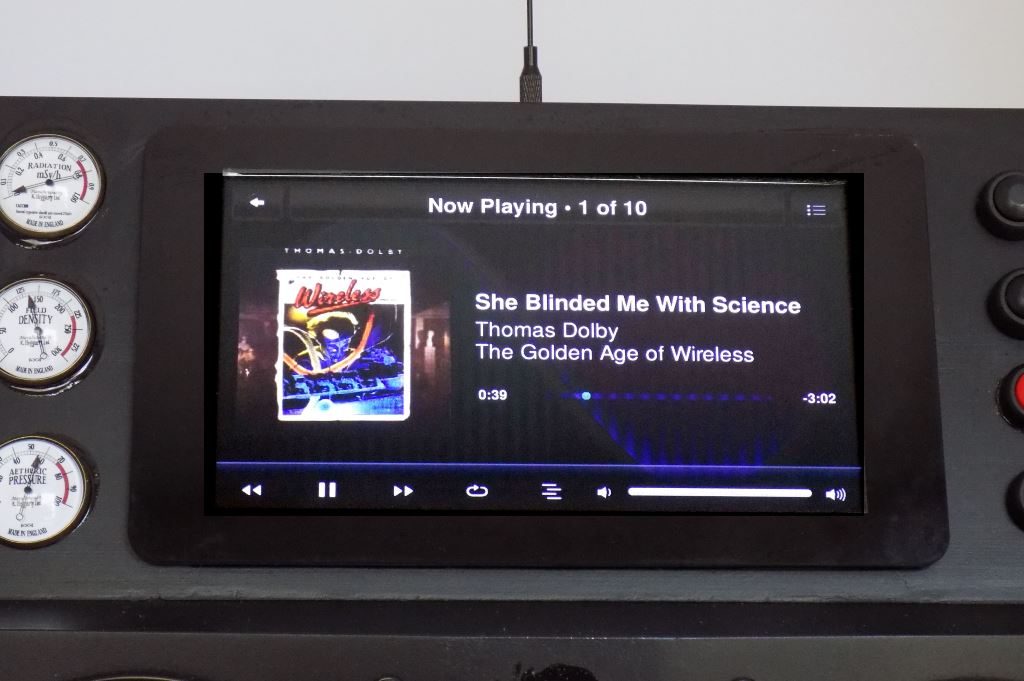
One day I saw a screenshot of a Linux based streaming player on the web. It looked amazingly similar to my Squeezebox Touch screen. I was very excited that it was now possible to build my own Squeezebox player from scratch.
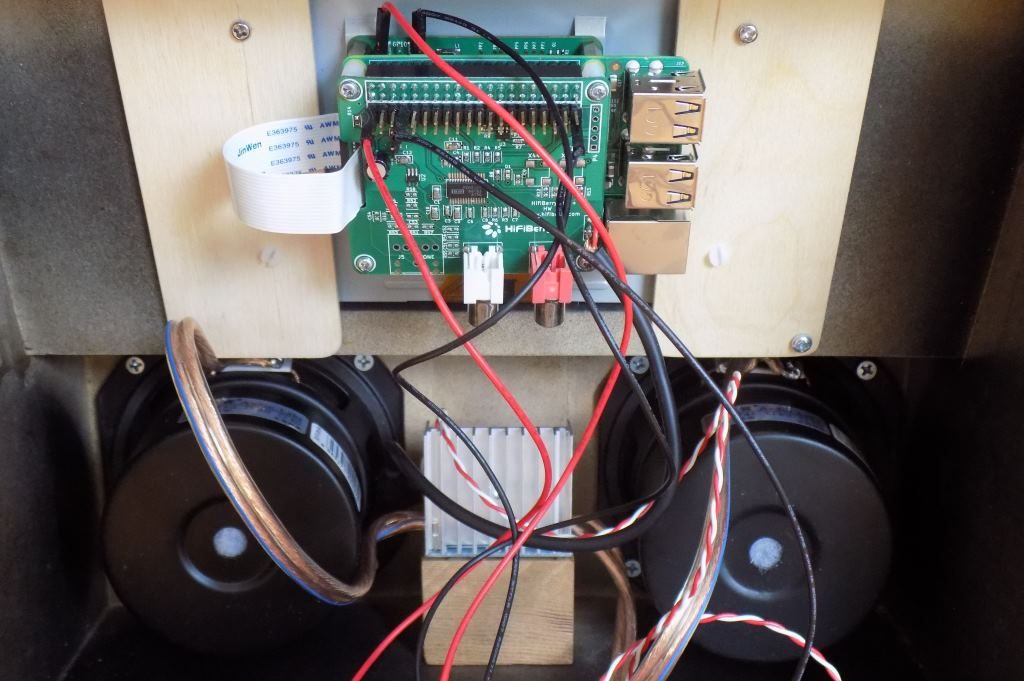
I had tested the RPi board and display with an SD card containing plain old Raspbian to make sure that the hardware was okay. The display, touch, and everything else worked fine. I couldn’t test the HifiBerry without drivers, but it was installed and didn’t smoke so that’s a good sign!
Note: I already have the Logitech Media Server running on my home Linux server. You will need the Logitech Media Server running somewhere on your network so you can stream music to any Squeezebox player. (One-Click Installation of version 7.9 in Max2Play on Raspberry Pi)
Setup
Here are steps I went through to set it all up the first time:
Step 1: You need to attach an Ethernet cable to the RPi for initial setup. There is a way to set up without it using a certain brand of router with Max2Play, but I didn’t have that hardware. (WPS on your router or Access Point Autostart since Max2Play 2.44)
Step 2: The first thing I experienced was the display was upside down. This was my fault, as I originally mounted the display that way to make cable access better (and actually, I mounted it right-side up according to the display spec).
Step 3: Once booting was complete, I needed to find the IP address of RPi assigned by DHCP. The http://max2play URL did not work for me, possibly because I have uPnP turned off on my network for security reasons. Anyway it was easy to find either by looking at my firewall log or my router’s DHCP assignments. You could also use one of those free IP Scanner programs that list all your active IP addresses.
Step 4: Once I had the IP, I used Putty to login to the RPi via SSH and changed the /boot/config.txt file by getting rid of the “lcd-rotate” line (You can also use the RPi-Display Plugin in Max2Play). Then another reboot. The display was now right-side up.
Step 5: Next thing I did is setup WiFi, so I can pull the Ethernet cable. Rebooted, found the new IP, and was ready to go.
Step 6: Now I entered the new Wifi IP address into my browser (in my case, http://192.168.0.112) and voila! The Max2Play web server home page appeared. Interesting that I never had to enter the IP address of my Media Server computer, as Max2Play found it on its own.
Step 7: You need to do a few maintenance things before you’re ready to go:
Expand the filesystem.
Update Max2Play to the latest version.
Activate your license by entering your email address.
Step 8: You should deactivate Shairport’s Autostart. (You can also use the Automatic Audio-Switch)
Next step is for the HifiBerry card. You need to download and install the Max2Play HifiBerry plug-in, then select the board type (This now possible on first boot, without any plugin). You won’t have any sound until you do this.
A word of caution: The Max2Play website looks almost identical to the local max2Play webpage in your RPi. This can get very confusing, especially during plug-in installations when you have two browser windows opened with each. I found that things went a lot smoother once I realized this.
You should now be able to reboot and search through your music using the display and touchscreen and play to your heart’s content.
BIO
Joe Jaworski is an electronics engineer with 35 years’ experience in the industry. Most of his career was spent in California USA, where he worked in integrated circuit design and microcontroller embedded firmware. He now runs a company and website that provides services to hobbyists, makers, and R&D firms that need short run PCB fab and assembly, PCB layout and design, and a variety of other services at
www.joejaworski.com.
I hope it's okay that I post this great project which we recently collaborated on with a Max2Play user to publish in our blog.
If not, just let me know and I'll delete it right away. I just thought it might be pertinent to this sub forum
For a more detailed version of the article, check our blog.
Hi guys, this article is a big one! It is Joe Jaworski’s Jetsons Music Box, a fantastic piece of DIY production utilizing the some of the best features of Max2Play and the high-end sound of the HiFiBerry DAC+ sound card.
I contacted Joe a few weeks ago after seeing his project in a contest when I thought this has to have been made with Max2Play. He was fully on board and wrote this great, detailed report on how he got the idea for the box and how he was able to fully realize it thanks to the powerful components and a little bit of our software.
I hope you enjoy reading the article as much as I did collaborating with Joe on it!
Heiner from Max2Play
My motivation for building this project comes from the fact that the Logitech Corporation discontinued its Squeezebox and UE Radio lines several years ago. I have been a big fan of this open-source streaming protocol since the original SlimDevices products of 2001. I have many Squeezebox players throughout my home. I have looked at more modern alternatives but have not found any that meet my needs.
One day I saw a screenshot of a Linux based streaming player on the web. It looked amazingly similar to my Squeezebox Touch screen. I was very excited that it was now possible to build my own Squeezebox player from scratch.
I had tested the RPi board and display with an SD card containing plain old Raspbian to make sure that the hardware was okay. The display, touch, and everything else worked fine. I couldn’t test the HifiBerry without drivers, but it was installed and didn’t smoke so that’s a good sign!
Note: I already have the Logitech Media Server running on my home Linux server. You will need the Logitech Media Server running somewhere on your network so you can stream music to any Squeezebox player. (One-Click Installation of version 7.9 in Max2Play on Raspberry Pi)
Setup
Here are steps I went through to set it all up the first time:
Step 1: You need to attach an Ethernet cable to the RPi for initial setup. There is a way to set up without it using a certain brand of router with Max2Play, but I didn’t have that hardware. (WPS on your router or Access Point Autostart since Max2Play 2.44)
Step 2: The first thing I experienced was the display was upside down. This was my fault, as I originally mounted the display that way to make cable access better (and actually, I mounted it right-side up according to the display spec).
Step 3: Once booting was complete, I needed to find the IP address of RPi assigned by DHCP. The http://max2play URL did not work for me, possibly because I have uPnP turned off on my network for security reasons. Anyway it was easy to find either by looking at my firewall log or my router’s DHCP assignments. You could also use one of those free IP Scanner programs that list all your active IP addresses.
Step 4: Once I had the IP, I used Putty to login to the RPi via SSH and changed the /boot/config.txt file by getting rid of the “lcd-rotate” line (You can also use the RPi-Display Plugin in Max2Play). Then another reboot. The display was now right-side up.
Step 5: Next thing I did is setup WiFi, so I can pull the Ethernet cable. Rebooted, found the new IP, and was ready to go.
Step 6: Now I entered the new Wifi IP address into my browser (in my case, http://192.168.0.112) and voila! The Max2Play web server home page appeared. Interesting that I never had to enter the IP address of my Media Server computer, as Max2Play found it on its own.
Step 7: You need to do a few maintenance things before you’re ready to go:
Expand the filesystem.
Update Max2Play to the latest version.
Activate your license by entering your email address.
Step 8: You should deactivate Shairport’s Autostart. (You can also use the Automatic Audio-Switch)
Next step is for the HifiBerry card. You need to download and install the Max2Play HifiBerry plug-in, then select the board type (This now possible on first boot, without any plugin). You won’t have any sound until you do this.
A word of caution: The Max2Play website looks almost identical to the local max2Play webpage in your RPi. This can get very confusing, especially during plug-in installations when you have two browser windows opened with each. I found that things went a lot smoother once I realized this.
You should now be able to reboot and search through your music using the display and touchscreen and play to your heart’s content.
BIO
Joe Jaworski is an electronics engineer with 35 years’ experience in the industry. Most of his career was spent in California USA, where he worked in integrated circuit design and microcontroller embedded firmware. He now runs a company and website that provides services to hobbyists, makers, and R&D firms that need short run PCB fab and assembly, PCB layout and design, and a variety of other services at
www.joejaworski.com.
Comment